Creating groups in RP Repository
This article was written by Mike from the game Wreckage, played on OngoingWorlds.

Mike Krueger
In the last article I explained how players could create a webpage for their OngoingWorlds characters on the RP Repository site. This not only helps advertise our PbP games on another awesome site dedicated to Roleplay, but allows us to include information and widgets that may not be possible in their OngoingWorlds profile pages.
This time I am going to show players and GMs how to join or create groups for their OngoingWorlds games on the RPR site. Doing so is a great way to recruit new players for your PbP games as well as show how the characters involved are connected.
So let’s begin by logging into the RPR site. If you have not done so previously, please do sign up for an account, then log in.
Now click on your “Dashboard” link near the top of the page. Again, a page will display showing your characters as well as any groups you have joined. Note, you may need to click the arrow icon next to the headings in order to show them.
Both players who are seeking to join an existing group and GMs preparing to create a new one will now click on the “Join A Group” button toward the middle of the page.
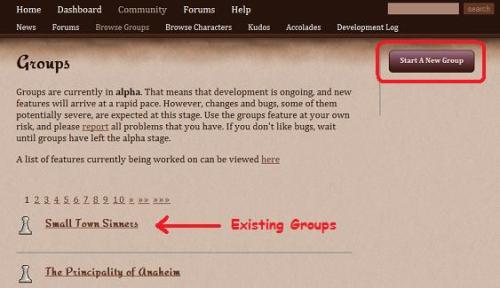
The RPR Groups page should load and show a listing of existing groups. The newest groups to be created are listed first. You may also use the search box near the top of the page to search for a specific group name or keywords.
When players have found a group they wish to join they should click on it. When the group’s page displays, find the link for joining and click it. You will then have to wait for the creator of the group (or in some cases, the members of the group) to accept you.
Do keep in mind that some groups may be set up as OOC while others are IC. They may also have their own rules for joining or accepting members.
Once you have been notified that you are a member of a group, you should be able to fully interact with the other members on that group’s webpage.
Now GMs may notice that when you first click on the “Join A Group” button, there is another labeled “Start A New Group” on the upper right of the RPR Groups page. GMs creating a new group should click this.
Similar to creating a new character page, another page loads asking you for the name of your new group, whether the group is for roleplaying or socializing, who you want displayed as the founder (your main account or a character,) and whether to list the group in the public directory or not. If you are trying to recruit new players, this is a very good idea. If you wish to run a mostly private group, then uncheck the box.
When you have entered or selected the appropriate info, click the “Create My Group” button.
Again, another familiar looking page appears with two buttons. “Quickstart Wizard” is what we click this time leaving the other for advanced users familiar with RPR site creation.
After clicking, another page displays telling you what sort of information you may wish to include. Click the button labeled “Create my page” when you are ready to continue.
Now we are getting into the meat of customizing our group page. You will see several buttons. If you wish to change the look of your page click the “Appearance” button.
Another page will load where you may upload an icon for your group. (This is used in the listing and a nice icon does draw attention to your game!) You may also upload a custom graphic banner. Do read the specs on this.
Finally, you may choose to change the colors of text and backgrounds on your page. Choose what works best for you and then click the “Save Colors” button.
Hit your browsers back button when you are satisfied and have saved your work. You will now want to click the “Applications” button.
There are some settings you can change on this next page if desired. Do pay attention to the Privacy Settings and be sure to choose those that best fit your group. (I recommend leaving the group as public as possible if you are recruiting players.)
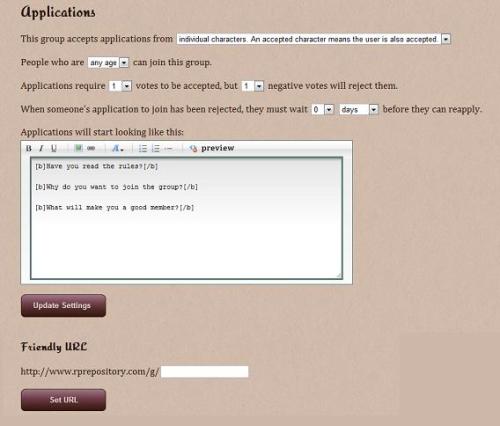
 Now for the actual Application settings near the bottom of the page. These can seem a bit confusing at first, so I will try my best to explain them so you may choose the best for your group.
You’ll see some text that reads, “This group accepts applications from…” followed by a drop-down list. The following choices are included in the list – and their meanings (as best I can tell,) follow.
- No one (invite only). – You must invite players or characters to join your group. They cannot apply otherwise.
- Players, representing all their characters. – Displays the player name as a member of the group but will allow access from any of their characters.
- Individual characters. An accepted character means the user is also accepted. – This will display the accepted character as a member. Other characters owned by the player cannot access your group.
- Both characters and players, separately. – A player or one of their characters may join your group but they are displayed and treated individually in your group’s widgets.
Below this you will find an accepted age option. Unless you plan to run adult only games, the default is probably fine.
Now for the bit about voting… you must select to have at least 1 vote if you do not wish for someone to join the group automatically. You, as the moderator/creator of the group will automatically be given the one default vote to decide who is accepted or rejected. If you want your group to decide who may join, you may change the settings to allow more votes. You will be able to change who can vote later once you have some members.
There is also an option to change how soon someone may reapply to join your group after being rejected.
Below this is a text box that you may edit that is shown to players when they first apply to join your group. Note the example questions and edit as desired.
When all your settings are changed how you like, click the “Update Settings” button.
Notice that you may select and save a “Friendly URL” for your group at the bottom of the page.
When you are ready to continue, click “Public Profile” near the top of the page. You will be prompted for a page name for your group’s first (main) page. Enter something you like and hit the button labeled “Create First Page.”
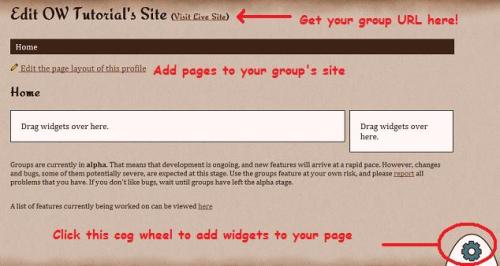
Again, a familar looking page editor opens allowing us to add widgets to our group page. Click the cog wheel on the bottom right and drag widgets onto the page to customize what info you want on your page.
By clicking on the “Edit the page layout of this profile” link you may add additional pages and place widgets on them as well. Remember, you can edit the heading text and widgets by clicking on the pencil icon near each heading name.
When you have added all the info and widgets where you want them you may wish to also add a Forum to your group. To do this, click “Forums” near the top of the page.
Now click the “Create A Forum” button. Next edit the forum as you like, then click the “Create Forum” button.
Your group page is pretty much done at this point and you may want to click on the “Public Profile” -> “Visit Live Site” links at the top of the page. This will show you how the page looks to others. Do be sure to grab the URL from your browser to share with others or include on your OngoingWorlds game page.
In order to add announcements, forum topics, or edit members and their status you will need to click the appropriate links at the top of the page. Remember, in order to access these links you will need to enter the “Edit Group” mode which is available on your group’s main page when you are logged in.
Note the other links at the top of your group’s page as well. It is where you will be able to review applications, invite member, check your inbox, and other things.
Yes, creating a group page on RPR can seem like a lot of work to new GMs, but the benefits of having your group listed on the site and the features that are included will most definitely be worth it.
Good luck and do remember to post in the RPR forums when your group is ready to accept members! Also, be sure to look for other OngoingWorlds groups and characters on RPR to join or invite to your group.
Happy gaming!
MnMike’s example group page: http://www.rprepository.com/g/wreckage


